Wednesday, 11 August 2010

Giveaway Fabric

Little Miss Shabby is giving away some wonderful fabrics by the designer Tina Givens... see here...

Wonderful Giveway
Wonderful Giveaway


Do visit her blog and comment for a chance to win these... http://littlemissshabby.blogspot.com/2010/08/pay-it-forwar
They are so cute!

Tuesday, 10 August 2010

Madame Sophie Sevenberry

Mme Sophie Sevenberry 
The Flower Seller

This is my second attempt at a Matroyshka and is a little better although not at all perfect. This time I got a better shape to the body so think I understand that part, and I also managed to get a little better in the drawing department and the face looks a little less masculine, ... still not pretty, just an improvement.

Mme Sophie Sevenberry
Back View

This doll is made in the range of fabrics from Sevenberry Japan, hence the name, and I think this one is a flower seller in the market ... I think she probably needs an apron. What do you think?

Fraulein Ginny Gunn

Fraulein Ginny Gunn
Going To A Wedding

Yes ... Frau Ginny Gunn now has a face. I have realized that I am rubbish at painting and drawing as well as sewing ... she looks somewhat scary ... rather like a man pretending to be a woman. My first transvestite Matryoshka doll? Oh dear! Must practice.

Fraulein Ginny Gunn

You may notice that she is also a better shape particularly around the head but feel that I have still not got this bit right. I shall try again. I also must learn a better way to photograph dolls, they look so weird lying down but seem to topple over when standing alone ... must try and fix that too!  Now to try and repair or remake the tote bag ...

Matryoshka Doll

 Frau Ginny Gunn 
Going To A Wedding

Recently I came across some really beautiful Russian dolls called Matryoshka. They were originally made in wood - nesting dolls - but more recently have been made in fabric and sold as souvenirs throughout Russia.
I had an hour to spare yesterday and tried one of my own as a little gift ... she is around six inches tall and looks to me like she is celebrating something, or maybe going to a wedding. She is made mostly in a pretty Laura Gunn fabric hence her name, and a few scraps of Robert Kaufman fabric ... here are the results. As yet she has no face ... I need to buy the appropriate pens to draw it!  I shall post a pic when it is finished. Meanwhile meet Frau Ginny Gunn ...

Front View Minus Face Detail
Back View
I have learned a lot by this little exercise and will be able to improve upon this at my next attempt. Perhaps less visible sewing and more handwork would look better. She also has an odd shaped head - do not know how I managed that ... maybe need a pattern!  I also think that a smaller print would be more appropriate. I am also wondering just what I can do to make it stand up better (it is stuffed with Kapok and propped up in the pic). What do you think? Comments would be most welcome.

Monday, 9 August 2010

Tote Bag Tutorial

I am simply rubbish at design and a bit slap-dash about quilting and cutting out but have decided to make a big and roomy simply quilted (ie rustic) tote bag for books and ... a tutorial to go with it. I shall probably regret this but here goes anyway... I have some lovely left over Lila Tueller fabric called Santorini and also a sizeable chunk of Robert Kaufman Basic Spots. They go well together and would, I think, make a pretty tote bag. This tutorial is basically 'make it up as you go along' or 'off the back of a fag packet design' ... (although I do not smoke!!!)

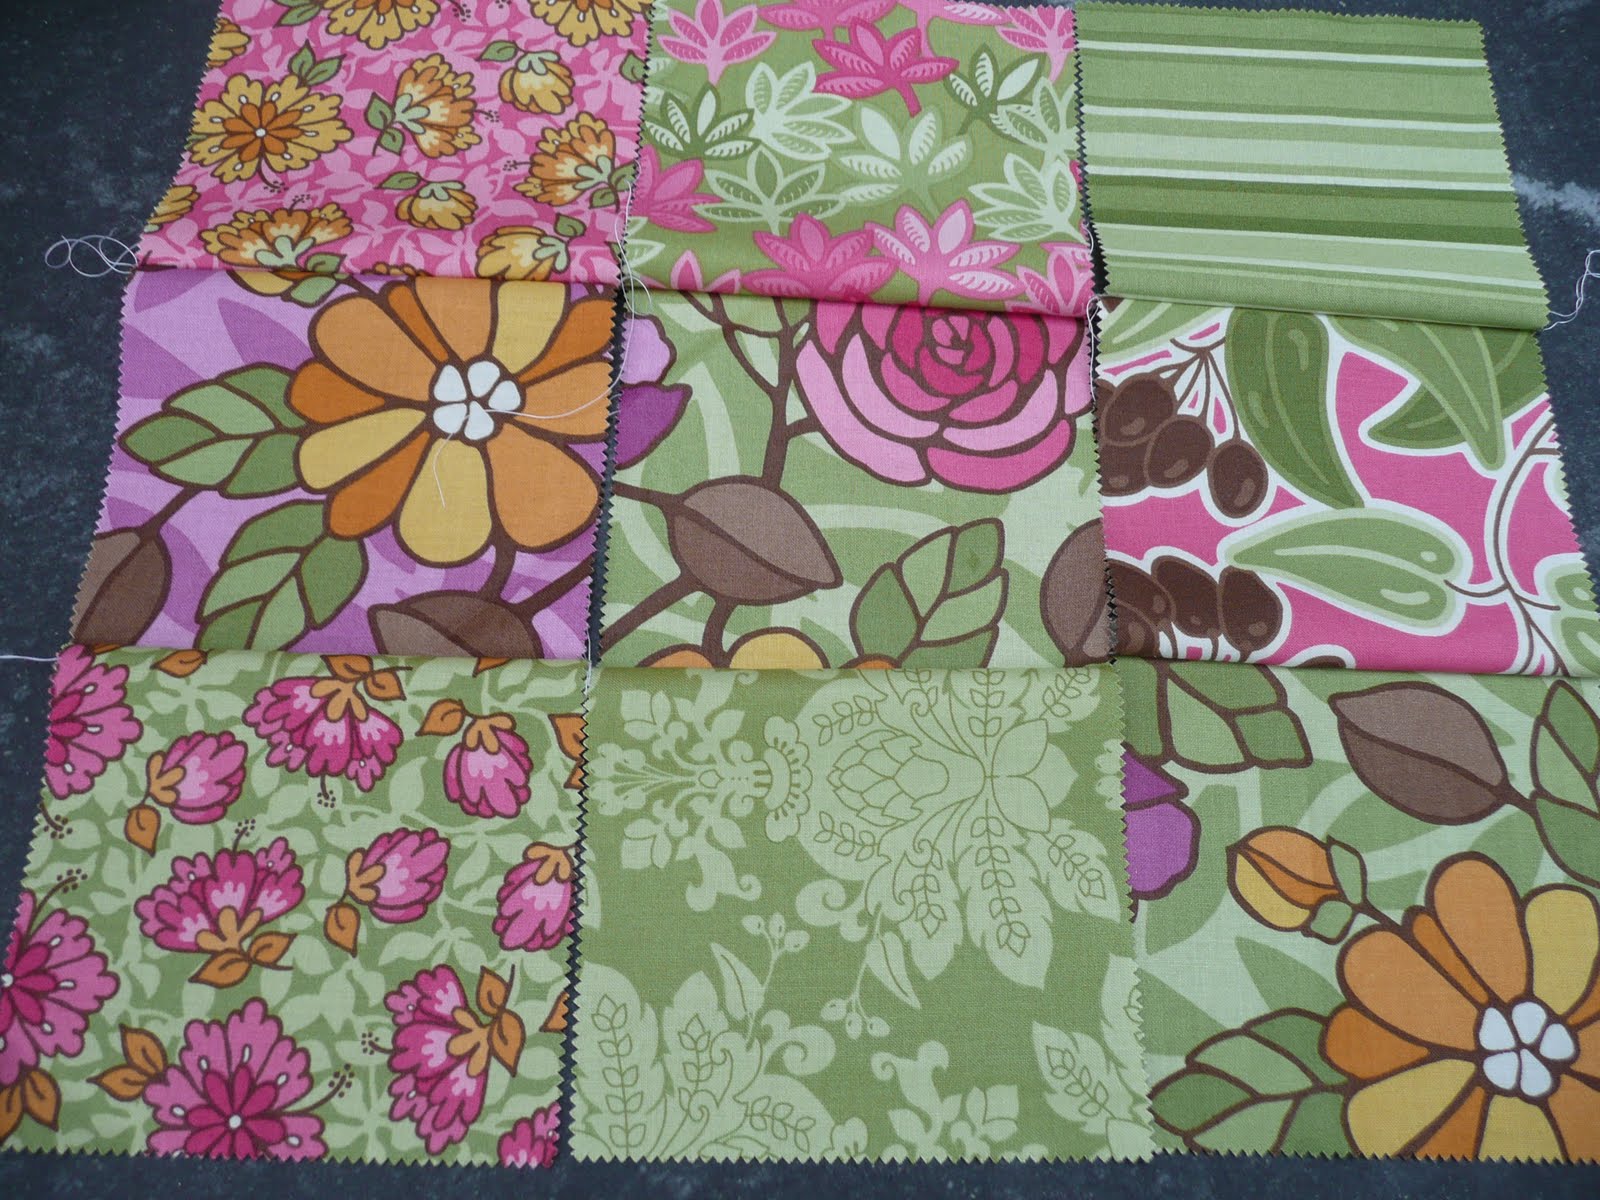
Cut some pretty squares - mine are five inches square.
Cut nine for each side of the bag = eighteen in total
Lay them out in a colourful eye candy design

One Side Of The Tote
Second Side Of Tote
Sew Into Strips Of Three
Second Side In Strips Of Three
Now Sew Strips Together For Each Side
Make Sure All Seams Face Same Way
Sides Are Now  Quilted Onto Wadding
Now quilt the side panels onto some wadding. I have made my wadding approximately four inches wider than the panels - more about this later. I have used a simple 'stitch in the ditch' for a quilting design (I am lazy) but it is possible to do any elaborate design at this point that you choose.

Lazy Stitch In The Ditch
Some Added Strips - Or Frame
Now to add some strips. Mine are two and a half inches wide. They are to frame the patchwork and make the sides and bottom of the bag. The three centre strips will become the bottom of the bag ... I have reinforced these with some simple top quilting strips to give added strength to the base. Also note that the centre strips are longer - this is to give the corners of the finished bag a bit more support. The side strips will become the sides of the bag and the additional four inches of wadding is to accommodate their width..

Reinforced Area To Become Bag Corner
Reinforced Centre Section To Become Bag Bottom
You Have Now Completed The Body Of The Bag
Now for the handles, lining and binding. For the handles you need two pieces of fabric roughly twenty-two inches by four inches and two strips of wadding of twenty-two inches by one and a half  inches. You can now make a tube with these lengths, enclosing the wadding inside to give some softness to the handles. I have added a little fancy stitch to the handles for added strength and decoration.

Now make a similar tube for the bag. We are going to put the padded bag front facing up and the lining of the same size facing down and sew both long sides together and leave the shorter ends (ie the top of the bag) open at each end. Turn the bag now so that the bag faces and the lining are both outside.

Red Lining Facing Patchwork
Turn Tube Right Way
You now have the body of the bag, which is fully lined. Now french seam down both sides of the bag (I used this method to give a good strong seam to the sides) and tidy the top to make it perfectly level. Now to attach the handles to each of the open ends. This will be attached at the same time as the binding/top inner lining. This is a strip of four inches wide and the circumference of the bag top, plus one inch. It need not be cut on the bias.

Handles And Binding
The Handles Attached
Handles Attached And  Binding In Place

Now to top stitch the outside of the bag. I decided to do two rows of zig zag stitch .... and it was at this point that disaster struck!!!! My sewing machine had a nervous breakdown and got itself into such a frenzy that it tied itself in knots....the mess was unbelievable and it was almost impossible to right the damage.  So ...

Strip To Hide Knotted Cottons

At this point I have added a pretty strip to hide the mess of cotton, which was almost impossible to remove. The lining at the top inside the bag is also a real mess and needs to be salvaged - perhaps with a hand-sewn strip or ribbon of approximately one inch depth - definitely no photos of this until it is rescued!

Work In Progress
Work Still In Progress
The bag now is ready for personal touches (cannot deal with the main body of the bag until machine fixed) - I am in the process of adding notions, buttons, flowers, strips and other personal things to give it a bit of individuality. The interior and top stitching is a real mess - but I shall continue working on this (perhaps more binding at the top when the machine recovers from its breakdown) and will post a pic when it is rescued.  The lining  is a pretty red dotted fabric, again by Robert Kaufman.

I bet people NEVER post their disasters - and this is a real mess ... so do come back tomorrow and see how it has all been resolved (new top, new handles, new stitching, new lining ... MAYBE NEW BAG?)

It is a truly big tote and measures approximately 15 inches wide and 18 inches deep - it will take masses of books along to my book club!! Yippee!!

Now to go and nurse the very poorly sewing machine and try to find out exactly what went wrong and hope that it can be resolved by tomorrow.

Alcohol Inspiration

Hi, have you ever wondered what alcohol looks like under a microscope? A research unit in the chemistry department at Florida State University has recently found out ... and it is so beautiful that in future I think I might just look at it instead of drink it!

Margarita
Rose Wine
Dry Martini

 The Dry Martini, in particular, is just swimming with wonderful colours and would look stunning as a fabric or a quilt project. What do you think?

Saturday, 7 August 2010

Old Quilts

Sorting through the airing cupboard today I came across some very old quilts that I made for my little children who are now rather big children!

Old Quilts In Laura Ashley Fabric


These were hand quilted many years ago in Laura Ashley fabrics, which used to be sold in conveniently cut packs. It made hexagons so much easier! I have decided to dissect them and turn them into more modern pieces - such as nostalgic cushions. My preference now is for more colourful designs such as the lovely (my favourite) quilt here:

My Favourite Quilt
This piece is in a Moda Fabric by the designer  Lila Tueller called Santorini and I am today making a tote bag in this same fabric. The tutorial should be here by tomorrow ... so watch this space.

Friday, 6 August 2010

Wedding Wishes

Happiness Tree
A Wishing Tree

My Lovely Niece Is Getting Married

It has made me aware of just how expensive and important a wedding can be and just how much effort can be made to make it a really special and magical event. I went to a wonderful wedding recently and was amazed by all the beautiful home-made items that there were that made it such an unusual and extraordinary occasion . One thing that particularly caught my eye was a 'wishing tree'. I had never come across such a thing before and thought it a truly original and charming idea. Apparently it originated in China and has now become a part of the general wedding planning ethos in the West.

In England at the Glastonbury Music Festival it has also become part of the event and there are some beautiful photos around associated with their imaginative 'wishing trees'. Yoko Ono recently exhibited her own version of the tree in New York ... really stunning pics but hardly her own original idea!

New Zealand  Wishing Tree
Chinese Wishing Tree
New York Wishing Tree

The simple idea is to find some pretty tags and a few twigs, or a tree! and a pen and let the guests 'wish away'! The end results are then saved and put into a scrap book and it seems so much more original than a traditional guest book. What a wonderful idea.

Glastonbury Wishing Tree


I do hope that my lovely niece will adopt this beautiful practice!

Wednesday, 4 August 2010

Painting Week

Today I have been painting - again!


Back tomorrow!

Marmite - Love It Or Hate It


Marmite is basically a by product of the brewing industry. Little has changed in its production method since it was 'invented' or 'found' to be  tasty in the 1900s.

Vitamins, spices, and vegetables are added to the yeast paste in a secret recipe and it is then bottled and sold. It is rich in vitamin B, and furthermore it is delicious on toast ... you either love it or hate it!

I also like these ...  Yummy!


And now for some Marmite coloured fabric ...

Marmite Coloured Fabric

Now what actually got me to thinking about Marmite was this beautiful fabric I found today. It is called 'Native Arts' and the designer is Robert Kaufman. I just love all the swirls and colours, which reminded me of the colours of  my Marmite on toast. I feel a quilt coming on ...

Tuesday, 3 August 2010

Shoes And Handbag By Katie Gold

Today I was thinking about shoes. I find shoes pretty boring. They are always matched (why is this necessary?), of course they need to be the same size and the same shape by why not a bit more exciting? (Same goes for socks - I fancy a pink and a lime green pair!). Camper did bring out a range of mismatched shoes called 'Twins' some time back but they were not significantly different - just slightly different.


Twins By Camper


I want some more exciting choice. How about these?


Shoes And Handbag by Katie Gold

I found these wonderful items recently while on holiday. They were made by the ceramicist Katie Gold who can be found in Upper Moutere, South Island, New Zealand. Wonderful, beautiful things ... wouldn't you just love to wear them? Do look at her other lovely work.


Isn't it all gorgeous?

Flowers

The Earth Laughs In Flowers

The E. E. Cummings quote "The Earth Laughs In Flowers" is something that always makes me smile. I recently saw this beautiful scene and just had to share it with you. Are you smiling too?

Painting Week

Today I have been painting!


Back tomorrow!

Monmouth Street Cafe, Borough Market

Makes Me Happy Monday

This wonderful cafe is so worth a visit. It is set right in the middle of Borough Market in London and is always heaving with customers ... here is why ... you buy a coffee and then sit at one huge table with lots of hot bread, butter, jams and spreads and just ... help yourself!  (Well it isn't quite that simple ... you have to pay for a plate first, which entitles you to 'help yourself'!) In the background and along one entire wall is a further huge table covered with delicious cakes, buns and tarts ... to die for ... just ask a waitress (and part with some more money) and you can eat as much as you care to.  I just love this place ...

Monmouth Street Cafe
This destination is a must for all foodies and is always crammed full of customers. The queue is long, the tables are always full, but the coffee and snacks are well worth the wait ... a perfect spot for breakfast!

Treat Yourself Next Monday

Sunday, 1 August 2010

Craft Whimsies

Becca over at Craft Whimsies has got me to thinking that I waste too much! I am heavily into recycling anyway but realized today just what could be done with old cards, posters, buttons and tiny things that I often throw away. I will try harder ... beginning today.

Some of Becca's Whimsies
Meanwhile I shall try and win these lovely items above to help me on my way! Why not try yourself?