Friday 17 August 2012

Bags Of Bags


Which Bag  Do You Use The Most?


I have a friend who is addicted to handbags (Hello S. x)


Via Reiss


She has an enormous collection of them and is always wanting to add to the stock pile. I myself  have very few handbags and have never been particularly interested in them, however, when doing a recent stock-take (oh ... alright then ... tidying my cupboard - at which point I threw eight away!)  I found I had a few more than I realised but sadly never the right one for the right occasion.

It got me to thinking about just what is the right one?

I have a very expensive Mulberry Alexa Bag (thank you Mr Whizz Kid for the mid-life crisis guilt gift). This only comes out for special occasions and never makes an appearance when food and drink are around. It is rather heavy but very beautiful and much admired.


Mulberry Alexa Bag in midnight blue calf


I have an inexpensive but very useful Cath Kidston Bag which sadly was designed with no zip at the top and consequently is not suitable for wandering the streets of London where every other person is a potential mugger. I use this locally and on family visits where the company is known and more trustworthy. It is covered in a lovely plasticised material and is perfect for occasions when a baby might vomit on it, food and wine might be spilled on/in it and for carrying the odd sandwich and drink from Pret a Manger to my destination. Thanks Cath Kidston - a lovely bag - but this design needs a zip.


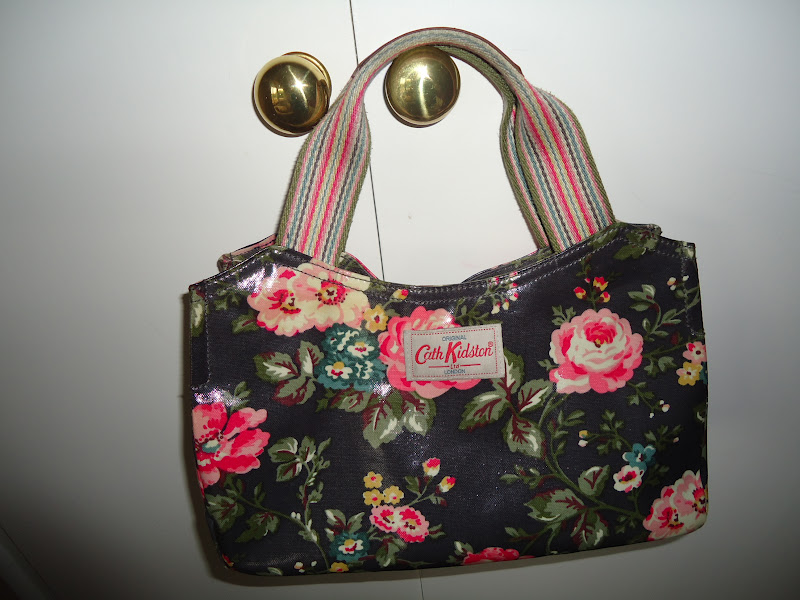
Cath Kidston Bag in charcoal rose


A little Chanel bag with a gold chain goes perfectly when all I need to carry is my American Express Card (I do not actually have one!) and I need to feel smart and have both hands free for cocktails and canapes - not a too frequent event in my life sadly. My glasses do not fit in it - meaning the drinks and food could be anything at all and I just would have no idea!


Chanel Classic Flap Bag


An enormous purple, soft leather bag, Le Duo Sac from Gallerie Lafayette in Paris won my heart as it had a smaller neat and matching clutch bag inside and I thought this would be wonderful for travelling back and forth to France, where the small bag could be used in the evening and the large bag carry just enough for a weekend trip. Since I have been unwell and not wanting to go to France quite so frequently the large bag has been unused and the smaller matching bag has been so well used it is now worn out and scruffy and destined for a local charity shop.


Le Duo Sac by Gallerie Lafayette


Coccinelle  Hobos Bag is wonderful as it sits under my arm (no one could wrestle that away from me) and is made of the softest Italian leather. I am so enjoying this bag and love that not only does my purse and glasses fit inside it but I can also get my camera and phone inside too and then zip it all safely away. I also appreciate the hands free element of this type of bag and it is so beautifully made with soft leather and has a stunning tartan silk lining - it is beautiful both inside and out and was an excellent buy.


Coccinelle Hobos Bag


One or two other non-descript items are still lurking in the cupboard, a Harrods Silver Beach Bag,  a bright green Betty Jackson Black Small Cross Body/Shoulder Bag perfect for walks, a very expensive mistake bought for a wedding: a Marc Jacobs Black Leather Shoulder Bag with a far too long strap, an old Patent Clutch Bag from Dior which goes wonderfully with smart shoes for weddings,  a small North Face Rucksac for visits to Borough Market (to carry the food goodies home), a beautiful silk embroidered evening bag bought locally from The Stitchery (never had an occasion to use it but it is beautiful to look at), a fake Chloe Paddington Bag foolishly bought from Ebay ... but none of the above is perfect for everyday use. Then of course there are all the totes and home-sewn bags,  and cheap M & S Bags and Gap Bags, which are rarely used.


Chloe Paddington Bag


Old Dior patent clutch

Betty Jackson Black green leather cross body bag

A beautiful embroidered evening bag from The Stitchery


Marc Jacobs shoulder bag


I got to thinking about what type of bag was really useful ... a bag to take money, a camera, glasses, a phone, car keys, and big enough to stuff a light scarf or a cardi inside, stashable, washable and wearable enough to go out to  Harrods or Waitrose, non precious enough to put chocolate and a bottle of water inside, something to fit over the shoulder for hands free shopping, a bag with a secure zip ... ah! ... a Longchamps shopper!


Longchamps Pliage Shopper in navy


Ladies all over France carry this brand and they all look so smart and elegant and the bag is so very sensible for all of the above reasons - and additionally they do not provide carrier bags in France and so people can be seen stuffing their lunches into the bag at the supermarket and it really does not matter. They come in three different sizes and can be used on all occasions (well perhaps not at toooo smart an occasion) and are lightweight,  inexpensive and very classy. This is mine  ... and I love it! Do you have a favourite bag?


Katie Holmes with Longchamps
Pippa Middleton with Longchamps
Alexa Chung with Longchamps
Alexandra Burke with Longchamps
Jodie Foster with Longchamps

See - all the celebrities use them!


And now for a little fantasy!


Alexander McQueen Embroidered Unicorn and Skull Clutch
Alexander McQueen Bag
Via PurseBlog
This is so very, very beautiful and magical and amazing
Just a dream!


Now tell me about your bags.

Wednesday 15 August 2012

Quick Bag Tutorial


Pretty Linen Bag


This is a repeat posting about two years old.  I was inspired to post it when realising that it had been little read and not commented upon. It seemed a shame not to share it with you!
 
 
I found two pretty tea-towels in a faded linen rosebud design and  I felt that they would make a lovely little bag. I decided to try something simple and made it up as I went along ... that's me ...


Firstly, I drew a design ...

Design


Secondly, I cut the main body of the bag and the lining ... one tea towel for each. If I had thought more carefully about it I would have chosen different fabrics for body and lining, merely because it is easier to photograph and it makes the instructions easier to follow. It also saves a certain amount of confusion!


Body Of Bag - Cut Four


The measurements I have given are for a small shoulder bag or large bag for a child or teen. I have left the seam at the bottom of the tea towel/bag in place to add more strength and body to the finished bag. I also left the seamed edge of the tea towel for the top of the pocket (because I am lazy!) The actual linen was rather stiff so I did not need to pad the bag.


Pocket - Cut Two Leaving Seam For Top Of Pocket


At this point I attached the pockets to two of the pieces - pockets for both inside and outside of the bag.


Back Of Bag To Show Pocket Sewing Line


The pocket sits centrally and lines up with the bottom seam. It has a central dividing stitch as the pockets will actually go either side of the finished bag ... this will become clear in a moment.


Front Of Bag To Show Pocket Sewing Line


Lay two pieces facing each other (one with pocket and one without) and sew the side seams together (between stars on the design drawing). Do not sew the bottom of the bag at this point. Do this both for the bag and the lining.

Now to turn all of the above on its head! The 'front' and 'back' are both actually the sides! Turn the bag as in the following picture.


Line Seams And Sew Bottom Of Bag


Line up the seams and sew the bottom of the bags - DO NOT FORGET TO LEAVE A 4" GAP in one to be able to turn bags inside out. You should now have two identical pieces, each sewn into matching bags ... one for the outer and one for the lining. You will now see that the pockets go around the bag. It would be wise to place the inner and outer bags (right sides facing) with the pockets on either side ... this will reduce bulkiness and make the bag less lop-sided when it is finished.


Line Seams And Pin


Now to make a loop for the button closure. Cut a piece of fabric about 7" by 3/4" (I used a seam of the tea towel for stiffness). Turn and sew into 1/4" wide strip. Pop this strip/loop between the bags in appropriate place and pin ends securely in place.


Sew Together Then Snip!


Sew all around the top of the bag and up the straps leaving the ends of the strap open. Double sew the area around the loop. Now snip all around the curve right up to the sewing line. Now turn the bag inside out through the 4" gap opening and push the lining (with the opening) to the bottom of the bag.


Almost Complete Bag


Now for some finishing touches. Join top of handles together and decorate if desired. Sew opening in the lining together by hand stitching neatly - or by machine if you prefer. Now top stitch all around the bag close to the seams. Find a pretty button and place on bag. - mine is an interesting 'horn' button given me by a friend (thank you S x).  I also made a simple flower to sit on the shoulder strap and cover the join, which I machine stitched together.


Pretty Flower
Finished Bag


Enjoy your pretty bag. Recycling at its best!

Tuesday 14 August 2012

Giveaway Result


Ugly Fat Quarter Giveaway - Result

No - I really did not forget. My 'Giveaway' was fairly disasterous as so very many of you looked, read, and decided the fabric was just toooooo awful to contemplate and did not respond. I had only eight responses - one in Portuguese and one from me with a translation - and one from 'Anonymous' - they really did not want the fabric did they!


Elephants never forget


So after a little discussion with Mr Whizz Kid we have decided the following - you are all far too polite or shy to tell us your tales of woe ... consequently from just a few responses (although hundreds of you seem to have viewed the post) ... the one that made us laugh the longest was ...


Ta Da!!!


'The Complete Works Of Shakespeare' from  Linda at Lawsons Place.  Poor Linda - I do hope that hubby has bucked up his ideas since then! What a first anniversary present!  Please send me privately your email address Linda and these ghastly fat quarters will be in the post to you asap. x


Very ugly fat quarters giveaway


I also really enjoyed the 'knickers' tale from  Flying Blind  - I think I am still wearing those knickers Hadley (I bought some huge ones after my op so as not to touch my scaring and am still wearing them - although they have been washed so much they are now back to a size 14!) They are still ugly granny knickers though!

I also must mention in this post how my Mother In Law - (Number 1) was a very keen knitter and used to buy job lots of anything cheap and cheerful. How well I remember how she kindly knitted me and the (then) three children some wonderful ski outfits in thick red wool before our ski trip one year to Italy - sadly no one wore them and they provided acres of mirth for years to come.


Wednesday 8 August 2012

Banana Ice Cream


Yes! We Have Some Bananas!


What is it with bananas? They go from this ...


Slightly green bananas


To this ...


Ready to eat bananas


To this ...


Only fit for the compost bananas


In the blink of an eye!


I love them when they are firm and yellow without a trace of a blotch on their skins - luckily Mr Whizz Kid prefers them a little riper ... but not too ripe. So I buy some green ones hoping that they will still be edible tomorrow ... and some firm ripe ones that we can eat today. Sadly if not eaten today then they are out in the compost tomorrow. Now Mr Whizz Kid also likes ice cream - far too much ice cream - so I have devised a cunning plan to keep him in wholesome ice cream and the compost empty of smelly bananas.


Banana Ice Cream


All you need are ripe bananas (not too ripe), a knife, a plastic container, and a small freezer space.
Chop the bananas into chunks, place in the box and put it in the freezer. Forget it for a few hours and then a quick whizz in the food processor and you have perfect wholesome banana ice cream. For a bit of extra flavour add some soft fruit or some hard nuts. This one has pecan nuts and a dash of maple syrup - very healthy.


All you need

Tiny space in the freezer
Wholesome pecan nuts
Lovely maple syrup


A quick whizz in the food processor and ...


Banana, maple syrup and pecan nut ice cream


Yes it really is that easy .... three bananas makes enough ice cream for two.


Banana Muffins


My other stand by for too ripe to eat bananas are banana muffins. Even I can make muffins! (I am useless at cakes). Just mash some bananas, add two eggs, a big splat of butter, a little sugar and some self-raising flour and a little raising agent. Do not be tempted to mix too well - a rather lumpy texture produces better muffins. (I never measure the ingredients as they are such a simple thing to make - the texture can be improved by adding more flour if too wet, and some milk if too dry. The mix should be thick and fairly 'ploppy' - I'm sure you know what I mean - although Jamie Oliver probably does not use this word). Pop in muffin cases and  sprinkle a little sugar on the top. Bake for around fifteen minutes until a sharp implement (knife, knitting needle - whatever is at hand) comes out clean. Yummy.

No pics as they are all eaten the moment they come out of the oven!


Monday 6 August 2012

Easy Zip Pouch


Zip-A-Dee-Doo-Dah!


I have three beautiful grandchildren and they love to get money (don't we all?) and I find a simple way to give them a little money and a gift is to make a small zip pouch and put some coins or notes in it. They are also perfect as a small gift with make-up, jewellery, sweets, knickers, boxers, socks, or other small items inside.


P, J, A
The grandchildren


The little pouches are used for only a short time and when dirty get discarded so no great effort is put into making or decorating them and they can be made from small scraps of fabric left over from other projects. Zips can be bought cheaply on Ebay (£9.50 for 100).

They take ten/fifteen minutes to make and are one of the most easy and satisfying thing to make as it is possible to turn out several in an afternoon - like today when it is raining! (Again!)


You will need ...

2 x 5 inch squares of outer fabric
2 x 5 inch squares of inner/lining fabric
2 x 5 inch squares of thin wadding or iron-on stiffener (optional)
Zip measuring 6 inch or more - any length will do - longer makes for easier fitting
Small length of narrow ribbon


The cut pieces


Now for the tricky bit ... layering the fabric in correct order to sew - many people call this part 'making a zipper sandwich' ...

Put the first piece of outer fabric face up.
Then lay the zip along the top of the fabric with the zipper wrong side up and leaving both ends of the zip exposed.
Now lay the inner/lining fabric on top of the zipper and the outer fabric wrong side up.
If you wish to add a wadding now place this on the top.
Align all the edges and pin.
Now sew them together.


Now do exactly the same with the other side of the zip ...

Lay the outer fabric face up.
Then place the other side of the zip along the top of the fabric with the zipper wrong side up and leaving both ends of the zip exposed.
Now lay the inner/lining fabric on top of the zipper and the outer fabric wrong side up.
If using wadding place this on the top.
Align all the edges and pin.
Now sew them together.


The outer fabric with the zip in place


The inner/lining fabric with the zip in place

How the layering should look


Now open the zip - this is very important.

Lay the fabric out with the two separate sides at each end (ie outer fabric together and inner/lining fabric together).
Now sew all the way around the outside leaving a four inch gap at the bottom of the inner/lining fabric.
Do two lines of sewing to make the pouch more secure.
Now turn the bag inside out through the hole in the bottom of the inner/lining fabric and the zip.


Turned through the hole in the inner/lining fabric


The inner/lining fabric can now be pinned and then sewn neatly along the bottom - again two lines of sewing will make the purse more secure - and then tuck the inner/lining into the pouch.


Small coin purse with a perfect zip

A pretty padded lining


To go with the bag made last week


I think a little ribbon attached to the zip makes for easier opening. Cute isn't it?


And another ...


And yet another


All made in under one hour .... now to get back to the Olympics!