Thursday 31 January 2013

Quick Knits


Chunky Knitted Cushion Cover
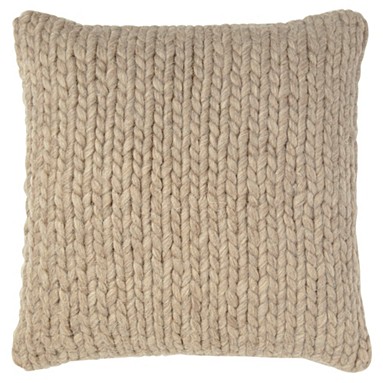


£.35.00 Debenhams


I saw some cute chunky knit cushion covers while shopping and wanted one - they were all around £30.00 - £40.00,  so decided I could make my own much cheaper. So ... I searched  Ravelry  and came up with a lovely cushion in a basket weave design that looked very simple. Luckily it had a downloadable PDF for free. I then bought some lovely chunky wool and started knitting. Sadly the wool I bought did not do the pattern justice - it was a basket weave design and it was just too busy with the chosen wool as it had so many different thread colours. I needed a more simple stitch to show off the colour variations.


Pattern by Julia Marsh


So back to the drawing board. I decided on a simple design in stocking stitch with just a little garter stitch band every now and then by way of decoration. The wool knitted up very quickly and I am almost finished in a day ...


Sirdar Super Chunky Faroe in 'Nestle'

Acrylic, wool and cotton mix (3 x DK)


The yarn is Sirdar Super Chunky Faroe in 'Nestle' at £3.50 for 50 gram. It is available online from John Lewis. I chose this dusky pink with threads of fawn, a darker pink and neutral as it goes very well with my sofa in the room that the cushion is for. It is a very thick wool - the equivalent of three strands of double knit and beautifully blended. It is a blended mix of acrylic, cotton and wool and I am knitting it on size 10mm needles. I intend to knit it with a large envelope flap and fasten it with some large decorative buttons.


Buttons from John Lewis at £1.50 each


The simplest pattern is as follows:
For a 15 x 15 inch cushion pad.
4 Balls of Sirdar Super Chunky Faroe - 200 gram
Pair 10 mm needles
4 x Buttons


Cast on 35 stitches
Knit ten rows in stocking stitch
Knit four rows in garter stitch
Repeat these two rows until the knit is about thirty six inches in length and fifteen inches wide
End after the four rows in stocking stitch if possible
Cast off losely

Join side seams (leaving the appropriate flap opening) and sew on buttons - the chunky has very large loops so I feel that buttonholes are really not necessary - but may modify this at a later stage.

I shall post the finished cushion tomorrow. I am so enjoying these easy knits even though they are keeping me away from my sewing machine.


Wednesday 30 January 2013

Paddington


Did You Know?


Arriving from deepest darkest Peru


The wonderful character of Paddington Bear, created and immortalised by Michael Bond, is commemorated on Paddington Station in London.  Living in London we take so much for granted and it is only when a wide eyed child takes an interest that we realise just how important London landmarks are to others. The life sized bronze statue, by Marcus Cornish, was erected on the station concourse in 2000 and has delighted children and adults alike ever since.


Paddington Bear
Paddington Station


While thinking about Paddington Bear, after a discussion with a little friend,
I wondered if there were any knitting patterns available to make one for her ...
and sure enough there were lots ...


This one from Ravelry, designed by Alan Dart, is my favourite.
As I am needing another project for my knit and natter group, this
lovely bear seems very suitable. It appears a very easy knit.
Isn't he cute?

And while thinking about Paddington Bear it is impossible not to think
also of his very favourite food - marmalade - and specifically
Marmalade Buns ...


Marmalade Buns

Ingredients

200 gr  butter
200 gr  soft brown sugar
3 eggs
Grated zest of one orange
Juice of one orange
2 rounded tbsps of thin cut marmalade
200 gr self raising flour

Optional: For the icing;
200 gr icing sugar
Juice of 1 orange


DSC_2426


Method

Preheat the oven to 180c/gas mark 4.
Put 12 paper cases in a bun tray.

In a mixing bowl beat the sugar and butter together until light fluffy.
Add the eggs one by one until fully incorporated into the mixture.

Add the zest, juice and marmalade and mix thoroughly.

Add the flour and fold in gently.

Divide the mixture between the 12 cases and bake in the oven for approximately 20 minutes.
When cooked transfer to a wire tray to cool.
 Eat and enjoy or ice ...

Optional:   To ice, wait until the buns are completely cool.
Sift the icing sugar into a bowl and add half the orange juice and mix.
Add as much juice as it takes to make the icing thick and glossy and spread over the buns.


Yummy Bear Buns

Monday 28 January 2013

Tea Bag Holders


Still Away To Go ...


As I may have mentioned before I had nineteen of these little scrappy tea bag holders to complete for the ladies in the Grand Tea Swap organised by Lucy. So far I have only managed eight so I better get on with them. These are the latest, which still need poppers sewing on them.


They are all a bit rustic and scrappy! I think that I might need to get out my Poppy Treffry books for some inspiration.


Anyone For Tea?


Sunday 27 January 2013

Knit An iPhone?


Fun Knit For Kids


My grandchildren are very lucky and have iPhones and iPads, that is all except for the very youngest. I decided to remedy this in a silly way - and knit him an iPhone. Trying to work out an appropriate pattern was a bit hit and miss ... but this is what I did.


Using number 4mm needles and a variety of double knit wools I cast on 18 stitches.


Cast on eighteen stitches in first colour


Using two main colours and a variety of bright colours for the keypads.
Starting at the bottom of the back of the toy.
For the first row I knit into the back of the stitches.
For all the following rows I knit in stocking stitch.
Knit five rows in first colour.
Change to second colour and knit seven rows in stocking stitch.


Knit seven rows in second colour


Back to the first colour knit seventeen rows in stocking stitch.
Knit into the back of the stitches for one row.
(This creates a ridge at the top).
This now completes the back ending at the top of the phone.


Top of the back and five rows of the front - top down


Continue on these stitches for the front (knit in one piece).
You will now be knitting the front top down.
Knit five rows in stocking stitch.
**For the keypads I divided the eighteen stitches into twos.
For each end and between each coloured pad I knitted the main colour.
For the keys (four keys) I knitted each in a different colour.
Each key carried over two rows (ie 2 x 2).
Between each set of keys I knitted two rows in the main colour.
On the third row of keys I knit just three keys as in the original.
Between the third set of keys and the last row of keys I knitted seven rows in the main colour.
After the last row of keys I knitted another seven rows.
One row was then knitted into the back and then the last row was cast off.


**Now at this point I was in a muddle while knitting five colours at once for each row and did not stop to take photos - I was truly TIED UP!


Finished knit with foam 4.5 x 2.5 x 0.5


Ready to sew together and stuff


So 18 stitches across and 29 rows each side make an iPhone of 4.5 inches by 2.5 inches,
which is the size of the original. (Size 4mm needles and DK yarn).


Fun knit iPhone Front


Fun knit iPhone Back


I'm sure that some of you expert knitters out there can improve on this first prototype - do let me know how to improve the toy.  Meanwhile I spent a happy hour making this just for fun!


Looking at a real iPhone I have realized it needs a little red dotted about - I will remedy this later.


Ta Dah!


Saturday 26 January 2013

Mason's Regency China Brooch


Masons China Memories


Brooch from Mason's China


When my eldest son was twelve he bought me a pretty plate for Mother's Day. It had come from the local junk shop and was so adorable. It was a Mason's Ironstone China Regency Style plate.


047r1 Masons Regency Pattern Plate
A pretty plate


When he was a little older and married I started collecting pieces for him and later gave them to him and his wife. Sadly these are now long gone but the memories linger on ...


Imagine my delight to receive in the post last week, all the way from NZ, this adorable brooch made from broken Mason's Ironstone China in the Regency pattern ... (Thank you B. x).  Isn't it a lovely thought? Sadly I have lost the tag so have no idea who made it but I am so pleased to know that even broken china from this range can look so pretty.


Brooch from broken Mason's China


Recently I bought this matching butter dish for a friend's birthday as she collects blue and white china. I think she was rather pleased with it.


048r1 Mason's Cheese Dish
Pretty butter dish


016r1
Pretty sandwich tray


023r2 Mason's Regency Toast Rack
Pretty toast rack


Photos and Mason's Ironstone China Regency pattern is available from  The Antiques Shop


Note:
"This Masons Ironstone China Pattern is called Regency and is one of the most sought after of all Masons Ironstone China Patterns. This pattern was also sold under the name of Plantation Colonial for the American/Canadian Market, and was specially made for Carl Forlsund. Regency is most commonly found in the Blue but is also available in the Red colourway. The china was produced by Masons from 1796 - 1856, when it was taken under the umbrella of Wedgewood. In 1996 it celebrated its 200th anniversary". Hollytree China.


Such a delightful pattern
Via Holly Tree China


Friday 25 January 2013

Super Scarf


Velveteen And Voile Scarf


Figure Eight Scarf Kit - Midnight and Lilac
The fabrics


I saw a lovely figure of eight scarf over on  Hadley's lovely blog ... and, being totally spoilt, I wanted one. She directed me to  Pink Castle Fabrics where the pre-cut fabrics could be found.  The kit costs US$.24.00. (Approximately £19.00 GBP).  After a little fiddling with my easy friend Mr Paypal  I purchased a kit in some lovely shades of purples, pinks and midnight blue. A week later lovely Mr Postie delivered this ...


PIC REMOVED ON ADVICE OF TAX INSPECTOR!


The pattern for this easy scarf comes from Anna Maria Horner - and it should be possible to sew it together in under an hour THAT IS if you are wide awake when you do it! I stupidly sewed the ends together without first turning the scarf through - schoolgirl error - and rather than unpick the seam I cut the ends, turned it through and re-attached it. So now my lovely figure of eight scarf is 18 x 70 inches instead of the stated size of 18 x 72 inches. It is still lovely though. The pattern can be found here


So one hour ten minutes later this is the finished scarf. The velveteen is a deep and fabulous fabric and the voile delicate and charming. It is beautifully soft and very eye-catching and I love it! Here are a couple of photos of me wearing it - and yes my hair really has grown again and is very long and very curly - totally inappropriate for my age but it is so good to have hair again!


Thursday 24 January 2013

Bowled Over By Bridgewater


Soup Bowls


Zelenka BowlSissinghurst Castle BowlFlame Leaf Bowl


Ayaka BowlRiika BowlPalette-Sketch Bowl


Zelenka, £16.00, Sissinghurst, £14.00, Flame Leaf , £12.00  all from Anthropologie
Ayeka, £12.00, Riika, £8.00, Palette, £12.00 all from Anthropologie


Zinnias French BowlPolka Dot French Bowl


Zinnias, £19.95, Polka Dot, £17.95 both from  Emma Bridgewater


Elizabeth Cereal BowlHamilton Cereal BowlPainterly Floral Cereal Bowl


Elizabeth, £7.50,  Hamilton, £7.50, Painterly, £7.50 all from  Marks and Spencer


I spent some time yesterday with a fellow blogger, who was searching for some interesting soup bowls to display her homemade soups on her blog. We looked at a selection in John Lewis, which were fairly uninteresting and consequently we came away with none. Thinking about it this morning I remembered the wonderful china I had recently seen in Anthropologie - so this post is especially for Annabellelouise. I do hope she finds something to her taste ... and here are a few of my own ...


I gave up taking photos at this stage when I realized that I had over twenty in this style (French soup bowl) alone and many more in different styles. These all come from my Emma Bridgewater collection and the bottom design is probably one of my favourites. (And ... no ... we really do not have soup very often)!

Soup is such a quick and easy thing to make that I am surprised that I rarely make it, however, when I do, my favourite would be cauliflower and bacon soup. If you have never tried it then these cold winter days are the perfect times to give it a try. It is deliciously creamy due to the natural properties of cauliflower and the bacon can be omitted for vegetarians.


Creamy Cauliflower And Bacon Soup


Ingredients:

1 Cauliflower
4 Rashers of bacon
Half pint milk
Double cream
Salt and pepper
Vegetable stock cube
A little grated cheese
Chopped herbs
Salt and pepper

Method:

Fry chopped bacon until brown and crispy
Put chopped cauliflower in a little water with the stock cube and cook until tender
Add the milk
When all is hot blend until smooth
Add a little cream to taste
Season to taste
Serve in a pretty bowl with the crisy bacon crumbled on top
A little grated cheese and a few herbs add to the taste and look